|
||||
Creating an Apple Menu LauncherWritten and published January 20, 1999 If you followed last week's column, you now have all of your programs organized into a few good folders. Your hard drive window is so clean you can see every project file clearly now and can therefore find everything you need. However, I left you unable to easily access, and therefore launch your programs. (I seem to recall someone once saying, “Sorry about that, Chief.”) But the inconvenience ends today as I show you how to turn the Apple menu into a foolproof launcher — one that won't cause too much hassle you when you need to start with Extensions off, and will continue to be helpful when you must do a long-term conflict test. I've been using this method for many years. Regardless of any other launch method, I always keep my programs handy under this menu. Ready to get started? Create a few folders
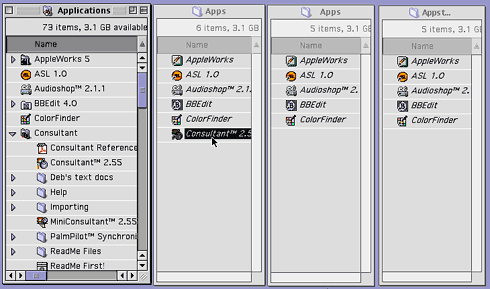
Make a few aliasesNow, open the Applications folder and position it so you can still see the two apps folders alongside it. Then open the folder of the first application stored inside your Applications folder. (That's easiest to do by viewing as a list and clicking the arrow to reveal the folder's contents.)
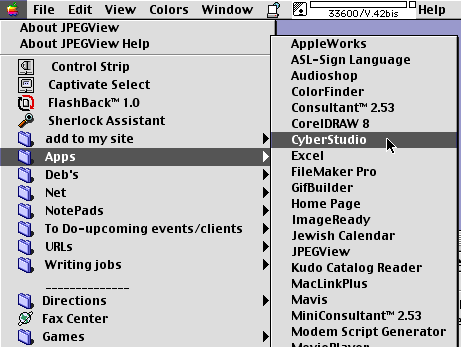
Press Option and Command as you click (not double-click) on the icon you use to launch the program. Keeping the keys pressed, drag that icon into one of the open Apps folders. This creates an alias of that first program and places it directly inside the Apps folder. Then create aliases of this same application by Option-Command-dragging into the other “Apps” and “Apps too” folders. Make aliases of each application you have chosen to store in your Apps folder. Once all of your programs are accounted for with aliases, you're ready to create your first method for launching those applications. Follow me to see where I am going with this, then later you can return your attention to the other folders such as your Utilities folder. Create a launcher in your Apple menuThe first place I like to launch my programs from is my Apple menu, as it is always accessible. To make something appear in the Apple menu all you need to do is place it in the Apple Menu Items folder. Items within that menu appear in alphabetical order, and it is most convenient to have your most commonly accessed items at the top. So. . . it’s the alias-containing folders with the spaces in front of their names that are going in your Apple menu. (If you don’t like this arrangement you can always rename or even remove the folder. It may make more sense as time goes on.) Begin by creating the launcher for your main apps. In your hard drive window scroll down to the System folder and open it. Scroll if you need to, until you can see the folder called Apple Menu Items. Then drag the Apps folder with the spaces in front of it into that Apple Menu Items folder. To check out your handiwork: click on your Apple menu. Your folder should appear at the very top. When you drag down to the Apps folder you should see the full list of all of your programs appear to the right. (Note: If you don't see the arrow you may have turned off Submenus in the Apple Menu Options control panel or started with Extensions off.)
Now, any time you want to launch one of these programs, you can go to the Apple Menu, move down a tad to the Apps folder, then slide over to launch your app. As with any folder in the Apple menu, you can open it on your desktop by moving your mouse down to that folder and releasing the mouse button while the folder is selected (highlighted). If you find yourself wanting to drag a file onto an application’s icon to open that file in that program, open this folder and drag onto the alias within it. Back to the other program folders. . .Once you have created launch folders for the first applications, do the same for your Utilities folder(s), Games folder, and any other such folders. Place them into the Apple Menu Items folder as well. Until Next Time. . .Since you won't be using the extra “Apps” folders, store them for now. Make a new folder in your hard drive window and call it “Temporary Alias Folders.” Then drag the extra "Apps" folders and the rest into that folder. I hope you’ll enjoy using the Apple Menu as a launcher as much as the people I’ve set this up for. Next week I’ll show you how to further organize the Apple menu and the items within each folder (for example adding dividing lines such as are in my own menus.) |
||||
|
|
|
• • • Next Column
|
||
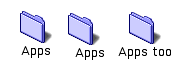 Click on your desktop to make sure you're in the Finder then create a folder and call it, “Apps.” Then create a second folder. To name this one, type 3 spaces, then type “Apps.” While you're at it, make a third called “Apps too.” (You won't be using “Apps” until next week or "Apps too" until later but it's easiest to make them all at the same time.) Open each and set them to View as a list (from the View menu), then make them tall and skinny so you'll be able to see what you're doing with each of them.