|
||||
"AppleScript Makes a Good Broom"Written and published May 1, 1999 Update: When I first wrote this Bill Briggs was a MacCentral reader, full of ideas (not unusual among my readers). After this column was published so many people wrote in asking for more on AppleScript that I proposed Bill do his own column. And thus, Mac Efficiency 101 had a highly successful spin-off - the AppleScript Primer. These days you can still find Bill's columns at MacCentral, along with mine. And, you can find Bill teaching AppleScript at Macworld Expo too. In fact, you can also find us speaking/teaching together at Macworld Expo; we did Mac Beginnings (Mac 101) in January 2001 and Mac Beginnings (Mac 101 and Mac 102) in July 2001. First, I have to admit that I am not the author of this article's title. Reader Bill Briggs is. It was the subject line of his email to me several weeks ago when he shared his AppleScript broom with me. I tried his suggestion and find it very useful. (Not to mention fun.) For weeks I've wanted to share this with you. Admittedly, I should devote one more week to the topic of email files since another 40 or so good responses have come in from another 40 or so great readers. I will pass those tips, many about Netscape mail, on to you next week. It also seems others have had more luck moving Emailer files. I'll look into that and report. Meanwhile, this week I give to you a great, handy AppleScript, thanks to Bill Briggs. For many of you this may be your first AppleScript creation. Just wait... <g> So what's Bill's Broom and Why?As Bill wrote to me, "necessity is often the mother of invention, and last week I had an incident that required a remedy..." It seems Bill has a friend who likes to reorganize Bill's desktop. (Heck, he downright plays pranks!) Of course, we all love our Macs, and being rather intimate with our Macs, like our desktop set up just right -- the way we like it. And, chances are that most of us have a friend like Bill's. (I'd tell you about the friend but I forgot to ask permission to quote him.) Anyway, Bill figured out how to undo the damage in one easy operation. Bill's broom script is handy even if you don't have a mischievous friend. For example, when you switch your monitor's resolution, icons become misplaced. (I happen to do this many times a day for screen shots for my books.) Bill's other reason is similar: he has a PowerBook and says, "If you use, for example, an 800x600 projector attached to a G3 PowerBook, when you get back to your desktop, sometimes your icons have been moved around a lot. This little cleanup device will get you back to your "normal" arrangement. As Bill wrote, "AppleScript and the recordable Finder to the rescue!" The solution, Bill's Broom, is a simple script you create for yourself, using Script Editor. Script Editor is a free utility that comes with your Mac system. You should find it in the AppleScript folder. Since everyone's desktop is different, Bill and I can't write your Broom script for you. It's up to you to create your own. Are you game? We hope you'll give it a go. Here's how. Making Your BroomBefore you begin, clean up your desktop. File away any lose files and keep only stuff you permanently keep on your desktop. (i.e. partitions, desktop printers, trash, aliases to folders/files you always keep on your desktop, etc. Now follow these steps:
Enjoy Your Broom! From now on, whenever your desktop gets messed up, just run that script and sit back for a moment as AppleScript magically sweeps everything back into place. I even use this script when my desktop isn't "messed up." I have three hard drive icons and just like them closer together than Apple puts them. My broom takes care of that for me. In fact, if I pop an alias of my broom into the Startup items folder (in the System folder) my desktop will be to my perfect liking day after day. Storing and Accessing Your BroomThere are two ways I recommend you store and use your Broom. (Remember that I always advocate keeping files in a place you'll back up. This is a unique circumstance as it is a utility of sorts, but only you have a copy. Therefore, you want to have a backup unless you want to recreate it again later.) One way is to place it in your Utilities folder, and launch it from an alias you place in the Apple menu. The other, far better, is to use Leonard Rosenthol's OSA Menu. A copy of OSA Menu Lite came with your OS 8.5 install, but get the recommended newer version from Leonard's web site, http://www.lazerware.com/. After installing OSA Menu and restarting, click on your desktop, go to the new OSA Menu by your clock, select Open Finder Scripts folder, and place your Broom or an alias of it in this folder. (Then close the folder.) Then you can run your Broom from the OSA Menu. It will appear in this menu whenever you are in the Finder. Next WeekMore on where to store email files. That'll finish up those data files. |
||||
|
|
|
• • • Next Column
|
||
 With the icons selected, move them en-masse a few pixels, then back to where they were, then release the mouse button. [After you move the icons, sit back and watch as the Script Editor documents the placement of every icon on your desktop, noting its placement in terms of screen coordinates. See the screen shot below.]
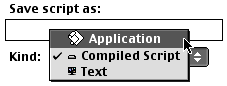
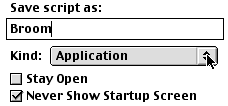 Name your script.