|
||||
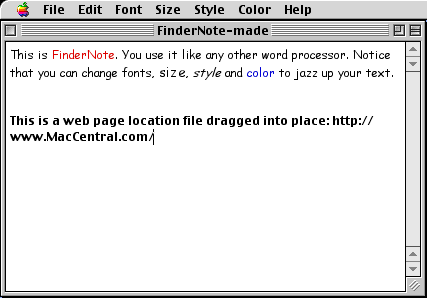
Note Taking - Part IWritten and published August 11, 1999 In the past few columns I've been talking about clippings and how handy they can be. But somehow I managed to leave out their best use: note-taking. Ah note-taking. A whole new topic for us to look at. When you're working on your Mac and someone calls you with news you need to write down, what do you do? Do you grab a pencil and paper? Or do you enter your notes directly into your Mac? Perhaps there are as many possibilities for note-taking as there are Mac users. (That's why we love the Mac.) Note taking just happens to fall into line with the two clipping applications I learned about through readers as I've been talking about clippings. So for the next week or so, I'll share some quick and easy way to take notes on your Mac. There really are several ways to take notes and store your To Do items. Perhaps the most logical way is to enter such items within a calendar or planner. If you're the type to have a calendar planner open all the time this may be all you need. Personally, I'm not. Instead, like grabbing any piece of paper I have handy, I also tend to grab whatever application I have handy. No matter. Either way my notes end up in a folder called To Do. The notes end up as clippings so they can be opened easily at any time, or even dragged into my calendar/planner - whenever I next happen t have it open. See, the secret to my note taking is... (have you guessed?)... clippings. [Sometimes I also use Apple's Note Pad, but that's a more deliberate note taking. I'll share my "brilliant" method of using the Note Pad to take notes somewhere along the line in this note taking series.] The benefit of using clippings for notes is that they can be opened in a second without needing to take the time to launch an application. Additionally, the clipped note can be dragged into any other document at any time. By giving the note a descriptive name, the clipping can be informative (to some degree at least) without even being launched. Note taking in the momentYou're working on your Mac and someone phones you. You need to take notes. What do you do? Do you grab a piece of paper? Do you launch SimpleText and create a new document? Do you launch your organizer/calendar and create a To Do item? Do you use Apple's Note Pad? Each method works just fine. So do many other methods. Here's what I do. When I get a call and need to take notes I just begin typing away in whatever typing application I happen to have open at the time. That's usually AppleWorks, Word 98, or Outlook Express. (If I'm not in a typing program I quickly switch to one of these three apps - whichever is running and easiest within reach.) To be honest, if there's no time, I don't bother to begin a new page or new document. Instead, I simple begin typing away. I even Save as I take notes. I know this may sound crazy. I might be in the middle of editing or writing a 43 page book chapter in Word and suddenly I'm writing a note to myself, taking down appointment information, or typing directions to a meeting location - right in my book chapter! But as soon as I'm done with the note-taking, I select that note text and drag it to my desktop so it becomes a clipping. [Or, as discussed July 14th I Control-click and use the Acme Widgets selection to make the clipping if in Word.] Once the clipping appears on my desktop I delete the text from my document and go merrily on with that document. Admittedly, sometimes I actually do begin a new document rather than risk typing within an existing one. Most often I'll do so if in Outlook Express since OE creates a new page very quickly. If I don't have a program open in which I can type, I launch the Note Pad from the Apple menu or launch SimpleText. The Note Pad is faster. The point is that a clipping can be made from just about any program you can type within so when you need to take notes fast you can just do so. By dragging the text out as a clipping you can keep it on your desktop and then file it later or drag those notes into a more appropriate document. Note saving from a sourceYou get an email and want to remember an action item within the message. What do you do? This is an easy one. Since the note information is already typed for you, all you have to do is select the pertinent information and drag it to your desktop to create a clipping. FinderNoteAnother option to dragging text out of a document to create a clipping note is to actually create a clipping in a program designed to make clippings. I know of two - both which were recommended by readers. I'll begin by telling you about FinderNote. Then next week I'll tell you about ClipPad, since ClipPad also addresses the note storage/filing issues we'll need to discuss. FinderNote, by Jae Ho Chang, is a freeware application specifically designed for creating clipping files. It's a mere 376k, with a 4k extension and it uses only 635k to run so it launches quickly and has minimum impact on your RAM availability. While you're in FinderNote, you create a new document by choosing File-> New just like in any other program. The picture below shows a clipping being written. As with any word processor, when you press Return you start a new line. After you type any text, you can select the text and change the font face, size, style, and color. You can also set a default font face, size, and style for the text in your new notes. To do so, you just set up some text as you like it, then choose Edit->Use as Default. As you work you can double-click to select a word or triple-click to select a line. You can also drag text around. Avoid using a tab within your text note, though or the clipping is sometimes interpreted as a picture clipping instead of a text clipping.
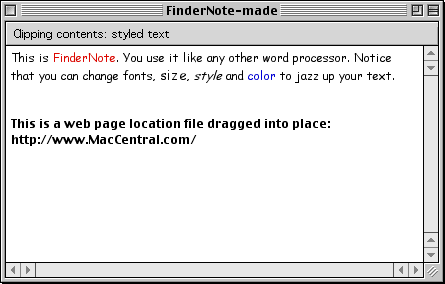
The key to FinderNote is that when you save your document, it is saved as a clipping. After you save it you can keep adding to it and editing it. But after you close it, then double-click it, instead of opening in FinderNote, it opens as a clipping (shown below) - no application is needed to read your note. And here's a cool catch: you can still edit the clipping any time by opening it in FinderNote again. Just drag the clipping onto the FinderNote icon and it'll launch in FinderNote; that's no different from dragging and dropping a document onto any application to launch that file in that application. (If you followed my earlier advice and have a pop-up tabbed folder full of items you drag onto, add an alias of the FinderNote icon to this Drag folder. Otherwise, keep an alias of the FinderNote icon handy on your desktop in order to drag onto it.
As long as your note is limited to text the clipping is created as a text clipping so you can drag the clipping into a document and have it come in as editable text. If you add pictures, the clipping may become a picture clipping and therefore not be editable when dragged into a document. To an extent you can add graphics if you're willing to give up being able to drag the note into a document as editable text. I was successfully able to copy the icon from a folder, then paste it in. I could also copy a graphic I created in AppleWorks, then paste it into the FinderNote. In each case, the note could be opened as an independent clipping, as well as be dragged into another text document to incorporate the clipping's contents into the document. (However, the clipping dragged in as a graphic, not text.) For further experimentation, I tried dragging a drag a graphic directly from an AppleWorks page into FinderNote. It worked and the note opened as a clipping. However, the note couldn't be dragged into a text document for inclusion. I was also able to drag a graphic directly from Photoshop, but the photo would not appear when I reopened the file later. It is also not meant for dragging in a closed pict, gif, or jpeg. You can save your FinderNote-made clippings anywhere on your hard drive. I mentioned long ago that I have a folder called Clips directly in my hard drive window. I save many clippings to this folder. Clips is set as a tab at the bottom of my screen for easy access. I also have a folder called To Do, which has a alias under the Apple menu. To be honest, that's been a great way to see my to do list. However, it wasn't handy for dragging clippings into. By using FinderNote or ClipPad (next week) it is easier to save clippings into the To Do folder. (Remember, I use Action Files to quickly save to specific folders.) I have never been totally happy with my To Do file. Another option would be to tab the To Do folder at the bottom of the screen. Yet another option may be found by using ClipPad - as you'll soon be able to see for yourself. Next WeekWhat happens after you have a folder full of clippings, but you can't recall what is in each clipping? Sherlock searches documents - if you've indexed your hard drive. To be honest, mine is never fully indexed so I can't tell you whether Sherlock can search within clipping. I still love Retrieve It but it doesn't seem to search clippings. So what to you do? My answer is ClipPad. I mentioned ClipPad a few columns ago and have now had the opportunity to use it. ClipPad, takes clippings a few steps further than FinderNote, providing search and storage features. Next week I'll tell you about it. After I tell you about ClipPad you can decide which, if any is right for you. Then I'll tell you about the Note Pad so you'll have several note-taking options to help you work more efficiently on your Mac. Update: June 2001. While still a fan of these apps, I also started using EZNote, by John V. Holder, several months ago and am fully addicted to it. |
||||
|
|
|
• • • Next Column
|
||