|
||||
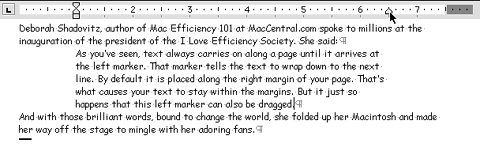
More Ruler Text Line ControlsWritten and published July 14, 2000 Hanging Indents and Text Blocks -- More Ruler Text Line Controls Last week I talked about indenting a new paragraph. This week I thought I'd take your new knowledge of the ruler's text line controls a bit further. I bring you two more uses for these controls: the hanging indent (affectionately called an "outdent") and the block quote. Once more, I suggest having your invisible characters onscreen. See this column to learn about invisibles. What is a Hanging Indent? A hanging indent (aka outdent) is the opposite or inverse of an indent. Instead of moving the top triangle on the text ruler inward to indent the first line of a paragraph, the first line begins to the left of the rest of the paragraph -- or outside the rest of the paragraph. Are you wondering if I'm just stretching things here, trying to come up with more things to show you? Wondering why you'd want to do that? Let's bring in the picture worth a thousand words. Here is part of last week's column. The information is helpful this week too.
Notice in each line where there is a bullet, the first line begins further left than the subsequent lines for that paragraph. (You might say the first line hangs out over the next lines, thus understanding its name.) The bullet's placement is the reason for a hanging indent. Remember the markers on the left side of the ruler? (The ones the image above describes.) You use them to set a hanging indent much like you create a regular indent. Creating a Hanging Indent Ready to try? Follow along.
1. Type a couple of lines of text. Leave the I-beam where you finish typing.
The I-beam can be anywhere within the paragraph for this. The paragraph doesn't have to be selected because this is paragraph-level formatting.
2. Since the top triangle is already at the left margin of the page, you can't drag it to the left. Instead, drag the bottom triangle toward the right.
When you release the mouse, notice all lines except the first line of text move. 3. Insert the I-beam in front of the first text, then type the bullet (Option-8). Of course, you can type any character in lieu of bullets on your own documents.
4. After the bullet, press the Tab key to type a tab. Looking at the rest of your text, you can see the text continues until it gets to the right marker, then wraps and begins again on the left at the point of the lower marker.
The distance between your bullet and the text is the distance between the upper and lower markers on the ruler. To close the gap between the bullet and text, move one of the markers closer to the other.
5. Now pretend you're not satisfied with the location of the bullet and text and prefer to have the entire bullet list further right. No problem. Just drag the rectangle that rides the lower rail of the ruler. Moving it moves both the upper and lower triangles at the same time so the distance you set remains intact. You can see this for yourself as you drag the rectangle. The same formatting rules apply as always: 1. What you do on the ruler affects all selected text. 2. If you place the I-beam in front of a paragraph marker and press Return, you carry down the formatting of that paragraph marker. But Why, Deb?Now, you might be wondering why I bother with this. After all, I must have noticed there are automatic bullet and numbering features within both Word 98 and AppleWorks ... yes, I do know about them. But those formattings are recognized only within their application:
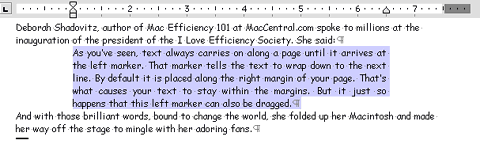
Also, it's best to understand how something is manually done so you know how to do it when you need to. The automatic methods are convenient and have some great features, such as automatic renumbering when you move lines around in a number list. So now you have a choice of methods. Creating a Block QuoteAs you've seen, text always carries along a page until it arrives at the right marker. That marker tells the text to wrap down to the next line. By default it is placed along the right margin of your page. (That's what causes your text to stay within the margins.) But it just so happens this right marker can also be dragged. To show you how this can help the look of your document and facilitate its reading, try this next exercise. Pretend the middle paragraph is a long quotation. The proper way to denote a long quote is to set it apart in its own paragraph but to start this text further in on the page and have it wrap further inward too. 1. Type or paste three paragraphs of text on a new page. Leave the I-beam where you finish typing. 2. Place the I-beam anywhere within the middle paragraph. 3. Click the bottom rectangle of the left-side markers and drag it inward about an inch along the ruler. (When you do this in your own document, the top and bottom markers should be either even or set for a small first-line indent. You can move each marker independently to get the right effect.) 4. Click the right rectangle and drag it inward about an inch.
5. Optionally, you can justify the text within the block quote to make it look more uniform. To do so, select the entire paragraph, as below, then click the Justify button on the toolbar or find the justify command under the appropriate menu.
ConclusionThis concludes our travels together on the ruler's indent rails. Enjoy them on your own; they can take your text to new heights -- or should I say widths! |
||||
|
|
|
• • • Next Column
|
||