Mac Efficiencyby Deborah Shadovitz |
||
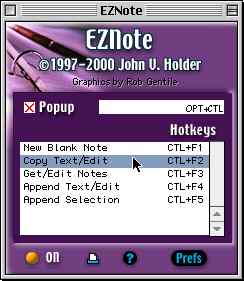
Easy Notes with EZNoteWritten and published Feb 2001 Once upon a time, in a millennium or so ago (August 99), I talked about note taking in a short series of columns and a few good people wrote to tell me about a shareware called EZNote, by John V. Holder. Well, I did try it — and like it as much as those of you who recommended it. So this week, EZNotes, it is. John is working on a major update that will turn it into an actual application, with full drag & drop support, multiple windows, and many other features. He hopes to have that out in a couple of months. So I won't get hung up on some of the details, but will give you an overview of it here. Overview of EZNote EZNote is... well... a really easy way to create, file, search through, and read notes. The notes can be created as SimpleText, clippings, or other document type of your own choosing. Each note is actually a stand-alone document, stored within one main folder called EZNote. This is the interface. When you select text and press the keys to make a new note, your text appears within the big window pane. To format your note's text you use the menus. Using the File menu, you can create new folder so you get to sort notes by topic. Of course, you can move notes between folders; that happens using the File menu too. Each note is fully editable so you can add more to it, or remove text too.
Installing EZNote EZNote doesn’t have an installer so its up to you to move the two items into their proper places (but it’s real easy). Here's what I recommend:
Setting up EZNote The current version of EZNote doesn't have an actual application. Instead, you create new notes and get to your notes by using keyboard commands. You use the Control Panel to change the shortcuts and other behaviors of EZNote. If you're using a desktop Mac, you can use the default command. If you're on a PowerBook, you'll need to choose your own key commands. On the front of the Control Panel, each of the five possible commands is listed. It's your reference to learn the commands. If those keys are convenient for you, you can skip this section and begin using EZNote. (The commands you see here are my own choices, for use on my PowerBook, no the defaults which begin with F13.)
If those keys aren't convenient for you:
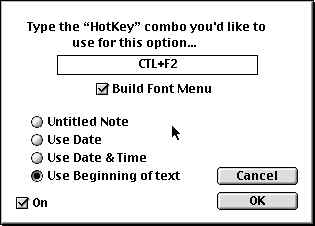
You can also set the note's default name. You can have it use the first line of your note, or use the date or date and time. To set this,
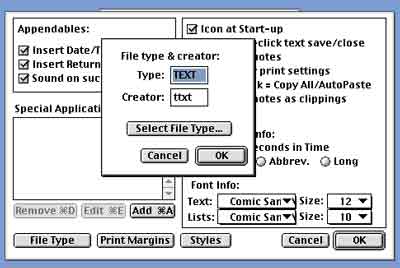
Notice there is also a "pop-up" command listed at the very top of the Control Panel. That's the command that gives you EZNote commands contextually from your desktop. To change the keys for this command, double-click on the command listed. Then check the boxes for the keys you want as triggers. Other Preferences include the font you use and auto insertion of the date, etc. Just click the Prefs button to get to them. For example, by default, EZNote creates SimpleText documents. However, you can choose an file type you'd like. In the Preferences, click File Type, then click Select File Type, and finally navigate to the desired application.
Using EZNote When you're reading an interesting email, web page, or document and wish to keep a record of some or all of the text:
When you're seeking information you have stored:
To add more information to an existing note, or change the info you have:
The Append Feature If you have a note to which you frequently add text, you can easily set it up so you can append the new text to it with a key command instead of seeking it out within the EZNote window. This feature can add substantial convenience, but it also takes a bit of practice. To make a note appendable:
To append a note:
If you have just one appendable note, this places the selected text at the end of the existing text in your Appendable note, adding the date and time to the added text unless you change that default. You will only see the new text. However, later when you view the note using the Get/Edit Notes command, you'll see all of your appended text. Cleaning up Text After you place any text into a note, you can clean up the text, removing extra characters such as line feeds. You can also count the number of words in any selection. You'll find all these commands under the Plug-ins menu. Just select the text within any note, then make your choice from the EZNote menu. In fact, you can even pop text into EZNote, clean it up, then copy it back out for use elsewhere. Conclusion If you're not already using a note-taking application that you love, consider EZNote. Some of you may already be using and enjoying FinderNote, a freeware I wrote about back in '99. I still think its cool too. If you who are using FinderNote, you may want to know that its web site announces FinderNote is being carbonized to run on Mac OS X as well as on Mac OS 8 and 9 — a complete rewrite. |
||
|
|
|
• • • Next Column
|