


Selection Techniques
Chances are, you've already mastered the basic click and drag. That is, click on a file or folder and press the mouse button as you drag it to another location. But did you know that there are ways to easily select multiple files, so you can move (or otherwise deal with them) at the same time?On the Mac we have a choice of how to view our files: as Icons, as a List, or as Columns. (Each has its own benefit.) In this column we'll look at the selection options you have for each view.
I focus on the Finder here, but these same tricks are pretty much consistent throughout all of your work on the Mac. Try the list methods in Mail or iTunes. Try the icon menthod in iPhoto, in layout mode of Keynote, to select graphic elements in a graphic or layout application or in a layout mode of a program like FileMaker Pro. Try them anywhere.
When viewing files as Icons
On your Desktop your files are depicted as icons. (You'll notice the View menu does not provide view choices for the Desktop.) You may also choose Icon View for your Photos folder and sometimes other folders that contain photos or graphics.
Do you have a bunch of files all near one another and want to move them all?
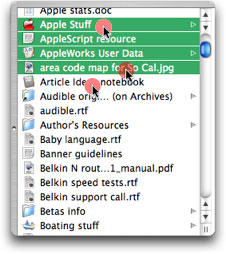
When viewing as icons, the fastest way is the marquee.


To do this:
Rather than clicking on a file, click just off the edge of that file.
Keep your mouse pressed as you drag it so the tip of the arrow moves over the first file you'd like selected,
then over any part (icon or name) of each other file you'd like to select.
You don't have to cover the entire item. You'll see each item become selected (darken) as you touch it.
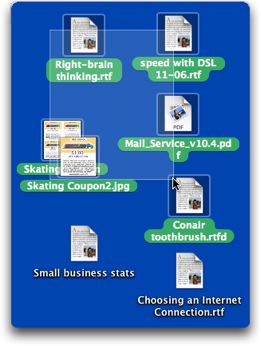
Here you can see that none of the selected files was completely included in the actual marquee. Six files have been touched and selected, while two have not been touched.
Once all desired files are selected, release the mouse.
Now that each file is selected, move your mouse over any of these files, click and keep the mouse pressed, then drag them to their new location. (Or do whatever else you planned on doing with them.)
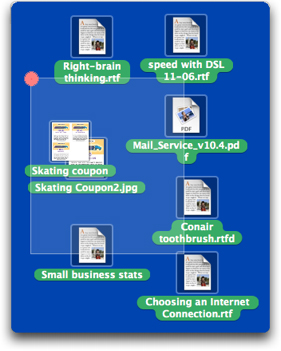
But what if you have a bunch of files all near one another, yet don't want every one of them?
 In this case:
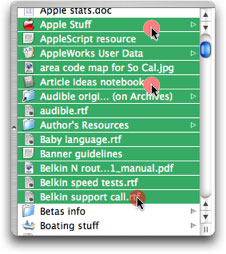
Begin with the marquee method as above and select all of the desired files, allowing the selection of the few you don't want to effect.
Release the mouse, but don't click anywhere yet.
 Then
Then
press the Command key and keep it pressed while you click one time on each file you want to remove from your selection.
Release the Command key when only the desired files are selected.
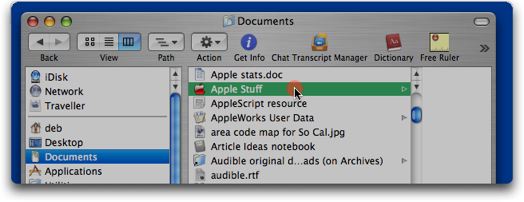
In this shot you see one file being deselected.
If you deselect a file but change your mind, just press Command and click on that file again to select it.
Now that each file is selected, move your mouse over any of these files, click and keep the mouse pressed, then drag them to their new location. (Or do whatever else you planned on doing with them.)
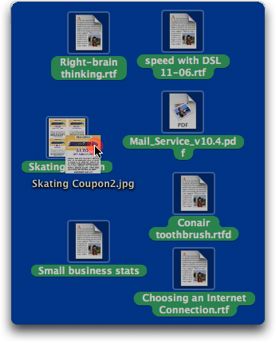
Or do you want to select only a few scattered files?
![]() To do this:
To do this:
Simply press the Command and keep it pressed as you click once on each file you want to select.
Then release the Command key when you've got them all.
You can click them in any order. Order does not matter.
If you select a file and change your mind, just press Command and click on that file again to deselect it.
Be careful: if you click on a file twice, too quickly, the Finder can think you have double-clicked that file and given the command to open all of your selected files. You'll then have to wait for each file to launch.
Now that each file is selected, move your mouse over any of these files, click and keep the mouse pressed, then drag them to their new location. (Or do whatever else you planned on doing with them.)
Note:
As an alternative to pressing Command for all of these selections and de-selections, you can press Shift as you click to select or deselect a file. However, the Shift key has a different function in other views, as you're about to learn, so it's not a good habit to get used to using it to select individual files.
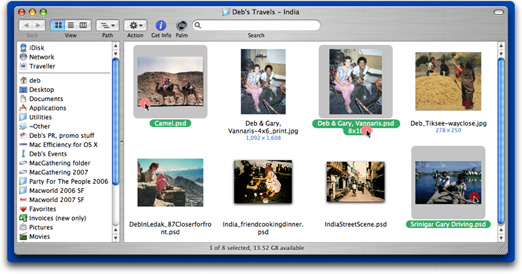
So far I've shown you selection of files on the Desktop. Here's an example of photo files selected in a folder where I'm viewing the photos as icons to see each photo. I've taken a liberty in adding mouse pointer/dot images to show you where I've clicked. The darkest red is the last click, but the order did not matter.
Tip:
Combine all 3 Icon selection methods: Marqee to get the bulk of your files, Command-click to deselect the unwanted files within your marqee, then Command-click again to select any other files that were out of range of your marquee.
When viewing files as a List or Column
When in a Finder window, the most efficient views are either List or Columns. Both display your files as a list, so both work the same. (I prefer columns.)
Do you have a bunch of files all one after another in a list and want to move them all?
When in List or Column view, there are two ways.
You can use the marquee method.
This method is fastest in many cases and can be done one-handed.
To do this:
Click in the white area to the right of your first desired file's name, then keep your mouse button down and drag down (or up) the list. Stop and release the mouse button at the last file.
As with Icon view, the trick to the marquee is to not click on the file's icon or name bcause you don't want to be dragging the file.
Here you can see the same files being selected. Left: Column view & Right: List view
You can select a bunch of files in a row by Shift-clicking.
 This method is easier when you have a long list of items to select, because you can use it along with the window's scroll bar. Unlike marquee though, it requires a second hand to press Shift.
To do this:
Simply click once on the top file that you want to select.
 Then locate the last desired file,
scrolling to it if you need to,
and press the Shift key as you click on it.
You can then release the Shift key.
Note: You can also do this in reverse, selecting the bottom file first. What you cannot do is start in the center and select both upward and downward.
Extending or shrinking that selection:
If you realize you've selected too many files or too fews, just press Shift again as you click on the last file you want in your selection.
 If that new last file is above the original last file, as shown here,
your list will shrink.
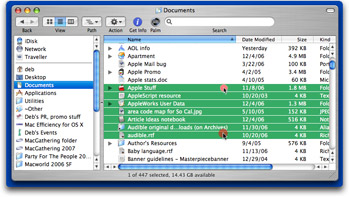
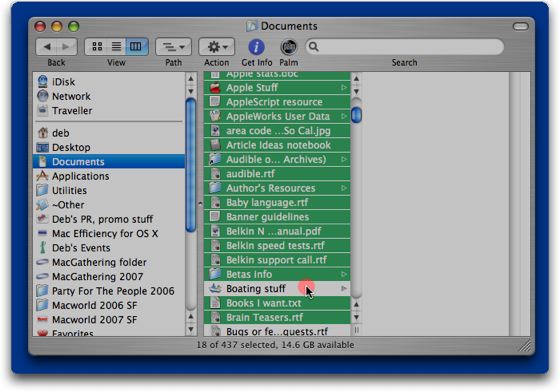
Here, the initial selection was from Apple Stuff to Article ideas notebook. Then the last click (the darkest red) was one file back up the list, on area code, so the selection was reduced.
 If that new selection is further down the list, as shown here, your selection grows.
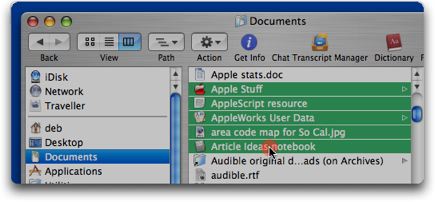
Here, the initial selection was from Apple Stuff to Article ideas notebook and the last click (the darkest red) extended the selection down to Belkin support call.rft.
Now that each file is selected, move your mouse over any of these files, click and keep the mouse pressed, then drag them to their new location. (Or do whatever else you planned on doing with them.)
But what if you have a bunch of files together in your list, but don't want every single one of them?
 In this case:
Begin with the Shift-click method (shown above) and select all of the desired files, including the few you don't want.
Release the mouse, but don't click anywhere yet.
Then press the Command key as you click once on each file you want to deselect, as shown here.
After you deselect a file if you change your mind, just press Command again and click once on that file again to reselect it.
And if you only want to select only a few scattered files...
This is the same as it is in Icon View.
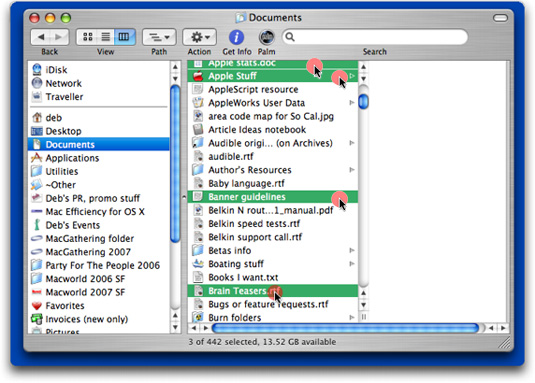 Just press the Command key and keep it pressed as you click once on each file you want to select.
Then release the Command key when you've got them all.
It doesn't matter which file you click first or last.
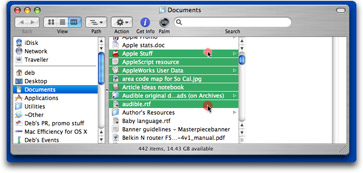
Here, I have clicked on four files. Again, in this screen shot I've added mouse pointer/dot images to show you where I've clicked.
If you select a file and change your mind, just press Command and click on that file again to deselect it.
And...(one last time)...now that each file is selected, move your mouse over any of these files, click and keep the mouse pressed, then drag them to their new location. (Or do whatever else you planned on doing with them.)
So...
You now have the basic foundation for selecting objects not only in the Finder, but in many programs as well. Give 'em a go. You'll save yourself some time.
Enjoy.
PS: If you like this article and want more, please sign up to receive a simple email each time I publish a new piece. It's easy.
Thanks to...
MacSpeech, Typical Mac User, MacCast, and Exam Professor
for sponsoring this article.