


Creating a Docked Application Launcher
If you've used your Mac for any period of time, you've probably noticed that when you launch an application it appears in the Dock — specifically on the left side (or bottom if you're side-docking). You also probably know that you can click on an application icon in the Dock to launch that program.
Putting an application icon in the Dock and clicking it there is probably the very easiest way to launch a program. However, if you put every program's icon there, the Dock will fill up, the icons can become rather small, and you won't have room to take advantage of the Dock's other benefits. (I'll be getting to those benefits in the near future.)In this article I'll show you a way to have all of your programs in the Dock and have easy access to them — without filling up your valuable Dock real estate. I don't know if there's an official name for such a tool. I just call it an app launcher. Creating an app launcher is fairly simple.
The process is rather simple: You create a folder, fill it with aliases of your applications, then dock it.
Here are those steps in detail.
1) Click once on your Home folder in the Sidebar to select it.
This shows you the main level of your User folder — your own files.
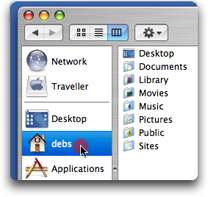
These items are seen to you, not to any other user when you create other users.
2) Choose File -> New Folder to create a new folder.

Because the Home folder is selected, the new folder will land there.
This new folder comes in as "untitled folder" with that name selected. Immediately type a name for your new application launcher.
Here I typed Option and 8 to create a bullet, then typed Apps.

I like to call my launcher Apps and put a bullet in front of it so it'll pop to the top of the list of Home folder contents. For the sake of this tutorial I'll assume you use my name but you can use any name.
Keep this Finder window open for step 4.
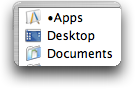
Naming your launcher folder
You may prefer to just name your launcher folder Apps or Applications or Programs.
Or you may want to begin with a space (rather than a bullet) so your folder stays at the top of your list.
Mark Hartman, a Southern California ACN, calls his folder Shortcuts. He prefers this more generic name because he places files in there as well as programs. I'll be getting into launching files from the Dock, so you might bear this in mind.
The best news is that you can always change the name later.
3) (Optional) You'll see this folder in your Dock and will use it frequently so you'll probably want to give it a nice icon that clearly says Applications to you. To learn how to customize this folder please see Customizing Folder Icons which will open in a new browser window via this link for your convenience.
Here's mine:
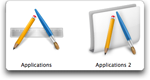
I found them on one of the icon sites. You may also be able to get them direct from dimensionofdeskmod.net, choosing the ICNS download, however this link is broken as I write this.
4) Place your apps folder in the Dock.
To do this:
Click on the folder and keep your mouse pressed as you drag the folder to the right side of the line that divides the Dock (or to the bottom if you are side-docked).
As you drag the folder over the Dock anywhere to the right of the dividing line any icons there move to accommodate your addition. When it is where you'd like it to remain, release the mouse button. (You can move it within the Dock at any time too.)
Here, I place this folder at the line. I prefer that so it's closest to my other apps.
You'll notice that when you move this dragged folder over the left side of your Dock nothing happens. That's because the left side of the Dock is for applications.
Keep the Finder window open for the next step.
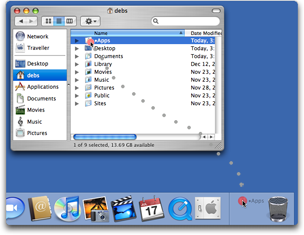
5) Create aliases of all of the programs you'd like it to be able to launch from your app launcher.
To do this:
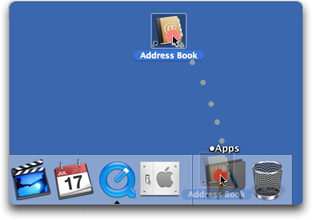
a) In the open Finder window click the Applications icon in the Sidebar so you can see all your programs.b) Press the Option and Command (Apple) keys at the same time, then click on the Address Book icon and immediately drag that icon to any visible portion of your Desktop. (It's times like these when having a clear Desktop makes life easier.)
If you do this correctly, when you begin to drag you'll see a curved arrow appear. Then you'll see that you're dragging a duplicate of the Address Book icon except that it has that curved arrow at the lower left of the icon.
This image is actually a video to better demonstrate. Click the Play button to view it. (No audio.)
If, instead, you see a green plus sign you've missed pressing the Command/Apple key properly. In that case, you'll end up with an duplicate of the Address Book on your Desktop. If so, delete that copy.
Note: If the key combo is too difficult for you, select the application's icon, then chooose File -> Make Alias instead. The alias will land wherever its app is. It'll say alias. You can edit that out later if that bothers you.
c) After you've successfully aliased your first program's icon (the Address Book) go through your Applications folder and repeat step b to alias all desired programs. Some programs are within other folders so you may have to open a folder to get to them. In the case of Microsoft Office or Adobe Photoshop you'll find multiple programs within one subfolder.
You probably have programs that you rarely access. Perhaps you'll want to omit these programs. You can always open a Finder window and click Applications in the Sidebar to get to those apps the rare times you need them. [clarification dded 10:44 1/18/07]
d) [added 10:44 1/18/07] Just in case you've also installed some applications that are available only to you as a User and not to other Users, click on the Home icon in your Sidebar and look inside of the Applications folder that lives in there. If you have more programs there that you'd like to more easily access, add their aliases to your launcher folder
To be clear, you won't be moving the programs. You're simply creating a pointer that, when clicked, points to the original so it's as if you clicked the original.
Alternative: Instead of dragging aliases to the Desktop, another way to do this is to open both the Applications folder and your new app launcher folder and position them so you can see both. Then you can alias the programs directly into the app launcher folder without going to the Desktop. Either way, the result is the same.
Tip: You can save time by aliasing several programs at once.
To do this, select multiple icons and then press Option and Command as you drag any of the selected icons.
You can learn more about selecting in Selection Techniques, which opens in a new browser window via this link.
 6) Now it's time to place your aliases into your App launcher folder.
To do this:
Click on any alias and drag it onto the Apps folder in your Dock so the folders darkens. While it's darkened, as shown here, release the mouse.
If you miss, the icon will appear in the Dock instead. In that case, simply drag the icon up off the Dock and release the mouse to "poof" it — either before or after you try again and actaully drag your alias into the folder. You have not really moved your alias. It still awaits on the Desktop. All you've done is create another kind of alias.
Alternatives:
Instead of steps 5 an 6, in step 5 instead of dragging to the Desktop you can drag directly into the Docked Apps folder.
I'm having you take the extra step because dragging into a Docked folder may be new to you and feel more difficult. Also, because this way you can see all your desired programs on your Desktop.
 That's it!
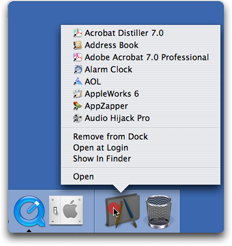
Once you have an alias in your Apps folder you can use it to launch that application.
To use it, click on your Apps folder and hold the mouse down for a moment. You'll see a menu pop up from it and all of your programs will be in this menu, as you see here. Simply drag your mouse up to any application listed and release the mouse to launch that program.
From now on, you don't have to open a Finder window, perhaps click Applications in the Sidebar, then locate your desired application before you can click it to launch that program. Instead, every program is only a click away in the Dock.
Editing your launcher
To edit your launcher, click the folder in the Dock. This opens the folder in a Finder window.
- As you install new applications, you can add their aliases to your launcher folder.
- If you delete a program later, the alias will simply do nothing when selected. You can trash that icon at any time.
- If you find you don't need or want an app to be in this launcher just trash the icon.
- You can edit the names in your app laucher. For example, instead of Microsoft Word, you can have the alias (thus menu listing) say Word. Instead of Adobe Acrobat 7.0 Professional, you can have it simply say Acrobat Pro. To edit, click the folder in the Dock to open it, click the alias's name holding the mouse down for about 2 seconds, then edit as you edit any text.
More to launch?
You can use this same principle to create other launchers too. For example, I have one folder (with a dice icon on it) that just contains the aliases of my installed games. It's docked next to my apps folder so I can get to that sometimes much-needed game break easily when I need to let my mind drift.
Why not just dock the entire Applications folder?
Marge asked:
Just to clear up something in my own mind; I have the applications folder to the right of the bar on the dock and if I click and hold that folder all of my applications pop up. The advantage to your folder and alias is to only have some of my applications listed and not all? Am I getting this right?
Exactly right. There's nothing wrong with docking your entire Applications folder. Many people do. It's easier to set up; just click on your computer hard drive icon in the Sidebar of the Finder window and drag Applications into your Dock. However, it's not as convenient for launching.
- If you have a lot of programs it can take a while for the menu to appear.
- If you have apps nested within subfolders it takes more effort to get to them.
- With the alias launcher you can place only those apps that you use often or are most likely to use. You can omit the ones you still want on your Mac but rarely use.
- Step 5d also shows you another benefit: you may have programs in both of your Applications folders.
You also may find another benefit in the next article or so.
[added 10:44 1/18/07]
Now that you have your programs accessible via your Dock launcher you may not need them in the left side of your Dock. However, you may want to wait until after you've read more about Dock strategies before you poof any programs out of your Dock. I'll discuss those strategies in the next article(s).
Happy launching.PS: If you like this article and want more, please sign up to receive a simple email each time I publish a new piece. It's easy.
Thanks to...
TypeIt4Me, MacScrapbook, TopXNotes, and RadTech
for sponsoring this article.