


The Basics of Organization
It's 3pm — and your meeting is at 7.
Do you know where your speech/handout/presentation is?
"On my Mac" doesn't count as a great answer — unless you can actually find it in time to use it for your meeting.
Do you have recipes on your computer?
When it's time to cook up a storm, can you find that recipe for the greatest chocolate concoction ever?
Is all your travel info on your Mac?
Now that you're actually planning your dream vacation, can you *find* the info you stashed about that dream destination?
Have you been collecting snippets of info, research, and thoughts to write your great American novel?
Now that you're determined to allot 2 hours a day to it, can you find that info?
In one way, your Mac helps you get organized because so much (heck much of your life's documentation?), is on it. On the other hand, the larger the hard drive, the more you keep and the harder it can become to find what you seek.
The Mac becomes a filing cabinet, or a closet, or an entire office or home — and just like you have to keep those things organized or you end up wading through piles of stuff, you reach a point where you find you need to keep our computer organized. Not there yet? Good! Now here's how you can avoid that mess!
Computers can be like a well-organized home or office — or they can be more like your "junk drawer."
My friend's mother refuses to organize her files and had a Word 'virus.' It took ClamXav over 24 hours to run through the entire drive. Two days later my friend was... well, not very happy. He should have been able to run ClamXav on one folder at a time to get mom back on track with her job at hand.
- Spotlight is only as good as your memory of the words you used. Searching for "chicken" won't help if your info about the perfect roast referred to "poultry."
- Spotlight doesn't search for phrases, multiple words, or exclusions unless you learn and remember those protocols.
- People report it not finding files they know are there.
- Spotlight can take a while too.
You really will benefit from a well-organized Mac. It'll not only help you in day-to-day work, but also potentially in recovering files if your data is lost or corrupted.
Think of your Mac's Documents folder as your filing cabinet
You probably have a file cabinet, and in it you've got hanging files, one for each project, and in that hanging folder you've got manilla folders for each aspect of that project.
Like that cabinet, within the Documents folder, have a folder for each project you work on and store all files pertaining to it in that folder.
- If you have already been using your Mac or have transferred files over from a Windows machine, you've got files already. We're focusing on organizing those files.
- If not, if you have no files yet, you won't have files to organize, but read though this so you can create your organization as you start creating your own files. Perhaps create some folders in anticipation of what you'll be doing on your new Mac.
Begin by creating folders for your files
Unless your Mac is brand new and you have not transferred files to it, you're likely to have files in the Documents folder, maybe some on the Desktop, and perhaps other places as well. And if your Mac started life in OS9, you've even got a second Documents folder. Let's get them all organized in one central place, within your OSX User's Documents folder.
To open a Finder window
- Click the Desktop to be in the FInder,
then choose File->New Finder Window. - Click the Desktop to be in the FInder,
then press Command-N. - Click the OSX logo on the Dock.
(If you already have one open, this will just bring it forward, not open a new one.) - Double-click your hard drive icon on your Desktop, if you have that icon showing.
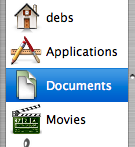
1) In a Finder window, click the Documents icon within the Sidebar.
This shows you all files that are in your user's Documents folder.
(Unless you're sharing files with other Users that are on your Mac, you want all of your files — except pictures, movies, and music — to be stored here. Read about this exception, below.)
To create a new folder
While in any folder or on the Desktop,
choose File->New Folder
or type Shift-Command-N
(OS9 users will notice the shift key has been added to this command.)
(Windows switchers: get used to using Command, aka Apple, where you're used to Alt.)
New folders are untitled, with that default name selected, so without clicking anywhere, type a name. If it's in a list sorted by name it'll jump to its alphabetical place.
New folders land in the folder that you're in at the time of creation.
Tip: You know you're in the Finder when the menu next to the Apple says Finder.
Tip: To get to the Finder when not there, click on any exposed part of the Desktop.
2) Look over all of your files that are already in there and on your Desktop. Notice when you have several files about one particular thing.
It does not matter that one file is Word, another is Excel, another is FileMaker Pro, others are jpgs, etc. What matters is that they are all part of say, your father's retirement party or the project you're doing for your child's class.
3) When you have noticed multiple files pertaining to one project, create a folder to house that project. (Because you're in the Documents folder, it will land in the Documents folder.) Give that folder a short descriptive name — one you'll remember so you can easily find that folder again in a year or two.
You will also be able to place another folder within this folder, but for now just create the main folder for each project. That way:
- you can see how full each folder gets and ad subfolders only when you see that it's becoming hard to find items within your folder.
- you're not as likely to go overboard with folders and subfolders. I learned the hard way that over-organizing can make it just as hard to find things as failure to organize.
Here as some examples of folder organization:
I have a folder called Jobs and in there is a folder for each freelance job I've ever done. Some of those, like the one called MacAddict, have subfolders as well — one for each article I wrote, and some of those even have subfolders.
I have a folder called Author's Resources, which doesn't need any subfolders. And I have one called MacGathering with a subfolder for each annual MacGathering™ and subfolders for each aspect of each annual MacGathering as needed.
or it may be appropriate to make a folder called Misc. Letters.
NOTE:
Within your Documents folder, you're likely to see folders you don't recall creating.
For example:
Acrobat User Data
AdobeStockPhotos
AppleWorks User Data
eFax Messenger User Data
Microsoft User Data
Mozilla
Maybe something from Quicken
Maybe folders of installer logs
Updater
Ignore these folders. Just leave them in place within the Documents folder. Don't put files into them, don't use them, don't delete them. These are created there by the software installers who should probably be putting their files into your Library folder, not here.
If seeing these folders in your Documents folder bugs you, see this tip.
4) Once you've created a project folder:
- click on any appropriate file on your Desktop and drag it into the new folder, as shown here.
and - click on any appropriate file within Documents and drag it into the new folder, also shown here.

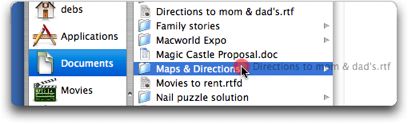
Left: Dragging a file called Michael's baby from my messy Desktop into a new folder called Family stories
Right: Dragging a lose file called Directions to mom & dad's into the Maps & Directions folder.
5) After you have organized the files that were already within your Documents folder and on your Desktop, it's time to check for files in other places. The easiest way do this is to see both the folders you're looking through and the destination folders. That is, to set up two Finder windows side by side.
a) You should already see your Documents folder in one open window. Position that one on the left side of your screen.
To do this:
Click the titlebar of that window (or any silver area) and drag it to the left side of your screen
Set this window to either list or column view by clicking the corresponding button at the top of that window. Here, mine is column view.
Then drag the lower right corner of that window to make it tall and thin so you can see all of its contents or as much as possible.
b) 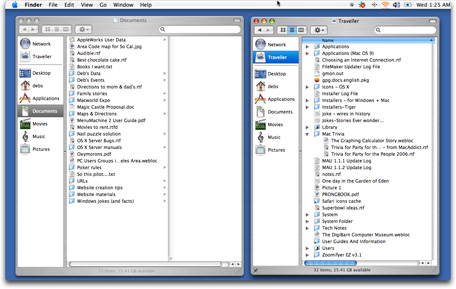 Now, set up the second Finder window on the right.
To do this
Open a second Finder window
by choosing File->New Finder Window.
Make it long and about 1⁄2 the width of your screen.
Then move it on the right side of the screen.
Set this window to either list or column view. Here, I have the left side set to column view and the right side set to list view.
Each Finder window is another view into your hard drive, like 2 windows into your living room. It is not a second copy of any data.
To move a file into a folder
Have the tip of the pointer be over the file to be moved, then click and drag the file. When the tip of the pointer is over the target folder and the folder is darkened, release the mouse.
You can drag onto a folder in the Sidebar, onto a folder icon you see in any view, or into the column to the right of a folder when that folder is selected.
6) You will now be able to look in the various folders via the right-side window, and drag those files or folders into the Documents folder (or into any folders within) which is is clear sight on the left.
a) In the right Finder window, click on the Hard Drive icon above the line in the Sidebar. This shows you everything on the main level of your hard drive.
- If your Mac started life under OS9 you'll have another folder called Documents there. Check for files in there and move them all into the other Documents folder, either into the appropriate folder or just loose inside the Documents folder. Then delete that empty Documents folder.
and
- If you see other files loose in the hard drive — and you're sure they were made by you, not the system — move them.
You'll notice the Applications folder. This is the very same folder that is in your Sidebar. You can look inside it this way, or by clicking on it in the Sidebar later. As always, you're looking for files that you are sure you created. You don't want a program's templates or samples; leave them where they are..
You'll notice the Library folder. This houses system and application stuff, but take a glance anyway just to make sure there aren't any files that you know you created. The same goes for the folder called System and, if you have Classic, the one called System folder.
b) Still in the right Finder window, click on the Home icon below the line in the Sidebar. This shows you every file that comprises your own user's work and program-used files that contain your settings.
- Again, move any files that you are sure were created by you. Some programs put log folders there, or even a program folder. Leave those in their place.
Look in just about every folder. For example, inside that AppleWorks folder (which you may have) are a few folders such as AppleWorks Essentials, and there are more folders inside that one. When there are folders inside of folders check every folder inside each folder in case one of your files has landed there.
Is this mine?
The hard part comes when you aren't sure whether a document is yours, a friend's, or one that belongs to one of your applications. For example, many programs have sample files and templates. Did you inadvertently save one of your own files into the Examples or Samples folder or are they all just examples? You may have to open many of these files to be sure. (Another trick is to look at the Date Created. If the date predates your computer purchase the chances are the file belongs to the program, not to you.)
Overwhelmed?
You might find it overwhelming to move and organize all of your files at one sitting. If that's the case, and you're finding too many questionable files, create a folder on your Desktop and name it File These, then place all questionable files or folders full of files into that folder. (If we were furter along in the tutorials I would not be telling you to put this file on your Desktop, but that'll do for now.)
Oops... Dupes...
Often, when I help people through this process I discover duplicates of folders and/or files. A person will likely have an identical, or worse, not exactly identical, folder in a second location. Sometimes even a third identical or somewhat identical folder. This is a hassle to deal with now as you organize your hard drive. However, it's also the best proof of why we need good organization. When you have two (or more) versions of a file, how do you know which to use? What if you edit one and then send the wrong version? That can be very embarrassing. But it can easily happen if you're not even aware that you have more than one copy. Worse, what if you work on one version one day, then another version another day. Neither will have all of your work in it!
So how do you know which version of a file to keep? You'll have to compare their content and decide. Or perhaps look at each Date Modified and choose the newer one. You can see the modification date in List view or when the file is selected in Column view, or by choosing File->Get Info for a selected file.
7) After you've created folders for each project, you can optionally anticipate projects, creating folders now and filling them as you create the documents.
If you don't like having files that are not yours in your Documents folder...
After I published this article, William Lane wrote to point out a problem he's seen enough times.
Apple gives you your own Documents folder to store all of your own files — all the stuff that you create. But then it allows (lazy?) software programmers to install folders in our documents folder when they should be putting their files into your Library folder, or someplace else, instead. (I've added a mention of these folders at Step 3.) Unfortunately, William's seen users delete those folders. That's not good because they're necessary for their respective programs to run.
If you're good at ignoring those folders and simply remembering which folders are your own, you're perfectly fine putting all of your folders directly into the Documents folder as shown in this article. But if it confuses you and you're like your own folder, here's the tip.
Create your own new folder — either inside the Documents folder on directly in your Home folder so it's on the same level as the Documents folder.
 Name it My Docs, Deb's Documents, Bill's Stuff, Mine! — or something like that. Now put all of your own folders and files in there — and whenever I say "Documents folder" you'll know for you this means your docs folder.
Many thanks to William Lane, President of the
Macintosh Computer Club of Calgary for having me add this.
Back to Step 3
The Documents folder exception
There's one great exception for placing files in your Documents folder. This folder lives within your User folder; it cannot be seen by other Users on your Mac. If you're using Multiple Users and want some files to be seen by all users, there are two options.
1. Place to-be-shared files in the Shared User folder. To get to this folder, click the hard drive icon in the Sidebar, then look in the Users folder. It'll be right there. If you'll be accessing this folder click once on it and drag it into your Dock. (I'll talk about other ways to easily access files in the future.) Remember that if you're placing files in this folder you'll want to back it up.
2. Place to-be-shared files on the main level of your hard drive. That is, the area you see when you click the hard drive icon in the Sidebar or otherwise open your hard drive. I'd recommend making a folder there called Shared Files, then putting all to-be-shared files in there.
But what about...
Photos, Movies, and Music
Apple provides us with folders just for Pictures, Music, and Movies. One one hand, it's a logical organization to keep each of those media files together. On the other hand, it goes against the wisdom of keeping folders organized by project. If you stored all those photos of your father's retirement party or your child's class play in the Pictures folder instead of in a folder along with all the other files, you'd be having to look in two places instead of one.
In the case of photos, Apple expects you to add them to iPhoto, not to keep them loose. You can add them to iPhoto, store your photos within the Pictures folder, or store them in your Documents folder. If you store them in your Pictures folder you can also create an alias and put the alias into the project folder within your Documents folder. We will cover things like this in time. For now, do whatever is comfortable for you for now. Nothing is etched in stone; you can move files around later on.
Apple provides us with folders just for Movies. This is where your iMovie and iDVD projects are stored by default. If someone has given you a finished QuickTime or Windows Media File or AVI file that's already made, you can store it in here or place it in your Documents folder. Of course, you can alwasys change your mind later.
Apple provides us with folders just for Music. However, it's not too often you'd have a music file that you'd store in a folder rather than adding it to iTunes. There is no rule that you must place all audio files in the Music folder. If you have an audio file, such as a voice recording of an event, or perhaps music for an event, store it whatever your prefer for now.
From now on...
Whenever you begin working on a project create a folder for that project. In the near future I'll write about Document Saving Savvy to help you file your new documents away most efficiently. Meanwhile you can save all new files to the Desktop and then move them after you're done working on it and have closed the file.
Wouldn't it have been nice if my friend could have run ClamX on his mom's one particular project folder, then opened and fixed those few documents and had her up and working again within an hour? And what if you don't have a Mac-savvy son who has me for a friend? Know what you'll pay a consultant to wade through your files for a whole lot of hours? It's easy to see that by keeping your files organized you can save on tech support fees. That, if nothing else, makes organization worth while.
If you haven't already got project folders, I hope you'll start creating them today. Life is easier when you can find your files.
Related help
Don't forget to look at article #2 to learn the tricks for selecting files so you can move several at a time.
Until next time...
PS: If you like this article and want more, please sign up to receive a simple email each time I publish a new piece. It's easy.
Thanks to...
iRemember, MacCast and Exam Professor
for sponsoring this article.